尤大大在5号凌晨公布了尚处于Pre-Alpha状态的Vue3源码。
Vue3主要的架构改进、优化和新功能均已完成,剩下的主要任务是完成一些Vue2现有功能的移植。稳定版的具体发布时间尚未提及,不过根据Vue在GitHub repo公开展示的Roadmap,后面应该还会发布Alpha(计划于 Q4 发布)、Beta等版本,所以至少要等到2020年才有可能发布3.0稳定版。
尤雨溪在去年发表的”Vue 3.0 Updates”主题演讲中曾强调过 Vue3包含的五个关键变化: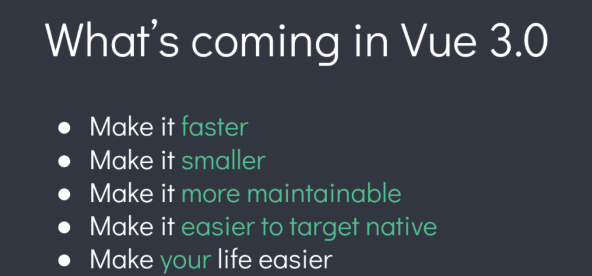
vue-function-api: https://github.com/vuejs/composition-api
composition-api: https://github.com/vuejs/composition-api
vue-next: https://github.com/vuejs/vue-next
vue3相对于之前的版本在目录结构上有很大的改变,主要的代码都在packages中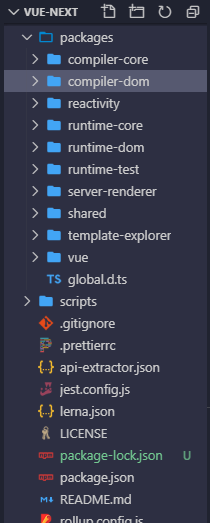
packages目录结构
1、compiler-core:核心编译器
2、compiler-dom:基于compiler-core封装对于浏览器的编译
3、reactivity:响应式
4、runtime-core:运行时的核心
5、runtime-dom:基于runtime-core编译浏览器支持
6、runtime-test:测试
7、vue:整合compiler和runtime
vue3和vue2最大的改变就是数据响应的改变
2.0的核心是Object.defineProperty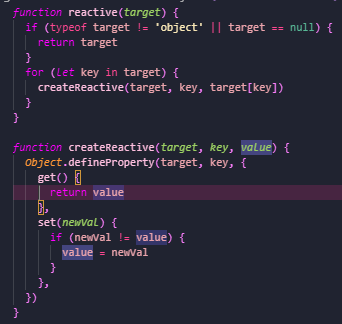
3.0使用了proxy代理的模式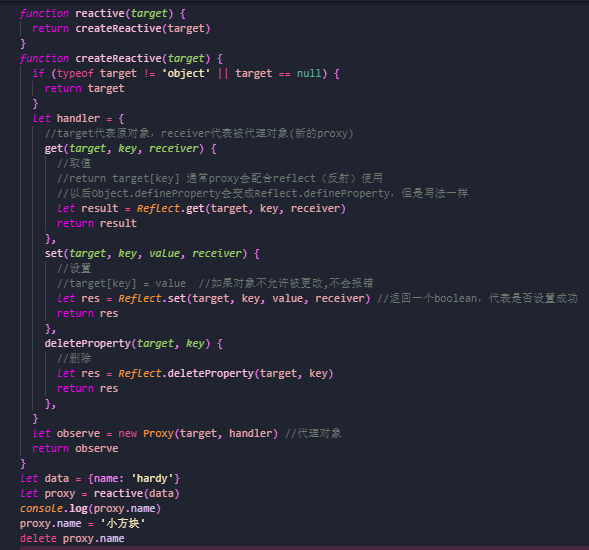
3.0的响应式和2.0的区别
2.0会默认递归,2.0数组改变length无效,2.0对象不存在的属性不拦截
尝试一个3.0
运行npm run dev,之后在vue目录下生成一个dist目录,里头有个vue.global.js,这个js就是3.0预览版的源代码
接着不用cli尝试一个3.0的程序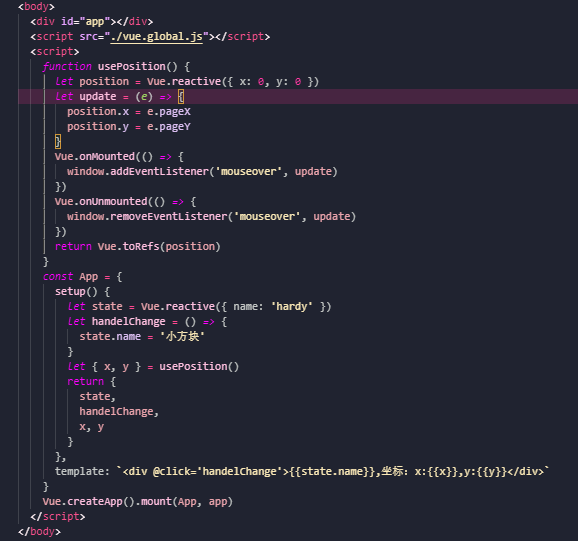
3.0 API
cli下使用3.0
先装一下新版本的cli1
2
3npm install -g @vue/cli
# OR
yarn global add @vue/cli
然后装一下composition-api(新的特性大都在这个包里面)1
2
3npm install @vue/composition-api --save
# OR
yarn add @vue/composition-api
装完composition-api之后要像使用vuex或者vue-router一样Vue.use一下1
2
3
4import Vue from 'vue'
import VueCompositionApi from '@vue/composition-api'
Vue.use(VueCompositionApi)
setup
vue3中专门为组件提供的新属性,Composition API的统一入口。setup函数会在beforeCreate 之后、created之前执行,不过在3.0中没有beforeCreate和created了
props
定义当前组件允许外界传递过来的参数名称:1
2
3
4
5
6
7
8
9
10
11
12
13
14
15
16
17
18
19//home.vue
<HelloWorld msg="Welcome to Your Vue.js App"/>
//helloword.vue
<template>
<div class="hello">this is hello</div>
</template>
<script>
import {} from "@vue/composition-api";
export default {
setup(props, context) {
console.log(props.msg);
},
props: {
msg: String
}
};
</script>
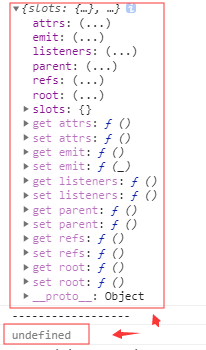
context
setup函数的第二个形参是一个上下文对象,这个对象相当于2.0时候的this,2.0中通过this.xxx拿到的东西,在3.0中通过context拿,而this是undefined,也就是说setup中无法访问this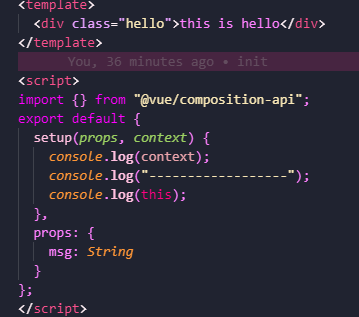
reactive
reactive() 函数接收一个普通对象,返回一个响应式的数据对象。
等价于vue2.x中的Vue.observable()函数,用来创建响应式对象,像上面写的1
2import { reactive } from '@vue/composition-api'
const state = reactive({ name:'hardy' }) //类似于data返回一个响应式对象
要在template中使用的话要在setup函数中return1
2
3
4
5
6
7
8
9
10
11export default {
setup(){
const state = reactive({ name:'hardy' }) //类似于data返回一个响应式对象
return {
state
}
}
}
<template>
<div>{{name}}</div>
</template>
ref
ref()函数用来根据给定的值创建一个响应式的数据对象,ref()函数调用的返回值是一个对象,这个对象上只包含一个.value属性,当把ref()创建出来的响应式数据对象,挂载到reactive()上时,会自动把响应式数据对象展开为原始的值,不需通过.value 就可以直接被访问
注意:新的 ref 会覆盖旧的 ref
isRef
isRef()用来判断某个值是否为ref()创建出来的对象;
应用场景:当需要展开某个可能为ref()创建出来的值的时候
toRefs
toRefs()函数可以将reactive()创建出来的响应式对象,转换为普通的对象,只不过,这个对象上的每个属性节点,都是ref()类型的响应式数据
computed
computed() 用来创建计算属性,computed()函数的返回值是一个ref的实例
只读
在调用computed()函数期间,传入一个function函数,可以得到一个只读的计算属性1
const newName = computed(()=>name='小方块')
可读可写
在调用 computed() 函数期间,传入一个包含 get 和 set 函数的对象,可以得到一个可读可写的计算属性1
2
3
4const newName = computed({
get:()=>{},
set:()=>{}
})
watch
watch() 函数用来监视某些数据项的变化,从而触发某些特定的操作
监听reactive类型的数据源
1 | // 定义数据源 |
监视 ref 类型的数据源
1 | // 定义数据源 |
监视多个数据源
1 | const state = reactive({ count: 0, name: 'zs' }) |
监视多个ref类型的数据源
1 | const count = ref(0) |
清除监视
在 setup() 函数内创建的 watch 监视,会在当前组件被销毁的时候自动停止。如果想要明确地停止某个监视,可以调用 watch() 函数的返回值即可1
2
3
4
5
6
7// 创建监视,并得到 停止函数
const stop = watch(() => {
/* ... */
})
// 调用停止函数,清除对应的监视
stop()
在 watch 中清除无效的异步任务
有时候,当被 watch 监视的值发生变化时,或 watch 本身被 stop 之后,我们期望能够清除那些无效的异步任务,此时,watch 回调函数中提供了一个 cleanup registrator function 来执行清除的工作。这个清除函数会在如下情况下被调用:
watch 被重复执行了
watch 被强制 stop 了
1 | <input type="text" v-model="keywords" /> |
LifeCycle Hooks
新版的生命周期函数,可以按需导入到组件中,且只能在 setup() 函数中使用1
2
3
4
5
6
7
8
9
10
11
12
13
14
15import { onMounted, onUpdated, onUnmounted } from '@vue/composition-api'
const MyComponent = {
setup() {
onMounted(() => {
console.log('mounted!')
})
onUpdated(() => {
console.log('updated!')
})
onUnmounted(() => {
console.log('unmounted!')
})
}
}
vue 2.x 的生命周期函数与新版 Composition API 之间的映射关系:
❌ beforeCreate -> use setup()
❌ created -> use setup()
beforeMount -> onBeforeMount
mounted -> onMounted
beforeUpdate -> onBeforeUpdate
updated -> onUpdated
beforeDestroy -> onBeforeUnmount
destroyed -> onUnmounted
errorCaptured -> onErrorCaptured
provide & inject
provide() 和 inject() 可以实现嵌套组件之间的数据传递。这两个函数只能在 setup() 函数中使用。父级组件中使用 provide() 函数向下传递数据;子级组件中使用 inject() 获取上层传递过来的数据。
provide和react的provide很像,在react中需要全局共享数据,使用redux,单一数据源,传入1
2
3
4<Provider store={store}>
<Component1 />
<Component2 />
</Provider>
共享普通数据
根组件1
2
3
4
5
6
7
8
9
10
11
12
13
14
15
16
17
18
19
20
21
22
23
24
25<template>
<div id="app">
<h1>App 根组件</h1>
<hr />
<LevelOne />
</div>
</template>
<script>
import LevelOne from './components/LevelOne'
// 1. 按需导入 provide
import { provide } from '@vue/composition-api'
export default {
name: 'app',
setup() {
// 2. App 根组件作为父级组件,通过 provide 函数向子级组件共享数据(不限层级)
// provide('要共享的数据名称', 被共享的数据)
provide('globalColor', 'red')
},
components: {
LevelOne
}
}
</script>
子组件11
2
3
4
5
6
7
8
9
10
11
12
13
14
15
16
17
18
19
20
21
22
23
24
25
26
27
28
29<template>
<div>
<!-- 4. 通过属性绑定,为标签设置字体颜色 -->
<h3 :style="{color: themeColor}">Level One</h3>
<hr />
<LevelTwo />
</div>
</template>
<script>
import LevelTwo from './LevelTwo'
// 1. 按需导入 inject
import { inject } from '@vue/composition-api'
export default {
setup() {
// 2. 调用 inject 函数时,通过指定的数据名称,获取到父级共享的数据
const themeColor = inject('globalColor')
// 3. 把接收到的共享数据 return 给 Template 使用
return {
themeColor
}
},
components: {
LevelTwo
}
}
</script>
子组件21
2
3
4
5
6
7
8
9
10
11
12
13
14
15
16
17
18
19
20
21
22
23<template>
<div>
<!-- 4. 通过属性绑定,为标签设置字体颜色 -->
<h5 :style="{color: themeColor}">Level Two</h5>
</div>
</template>
<script>
// 1. 按需导入 inject
import { inject } from '@vue/composition-api'
export default {
setup() {
// 2. 调用 inject 函数时,通过指定的数据名称,获取到父级共享的数据
const themeColor = inject('globalColor')
// 3. 把接收到的共享数据 return 给 Template 使用
return {
themeColor
}
}
}
</script>
共享ref响应数据
如下代码实现了点按钮切换主题颜色的功能,主要修改了根组件中的代码,子组件1和子组件2中的代码不受任何改变:1
2
3
4
5
6
7
8
9
10
11
12
13
14
15
16
17
18
19
20
21
22
23
24
25
26
27
28
29
30
31
32
33
34
35
36
37<template>
<div id="app">
<h1>App 根组件</h1>
<!-- 点击 App.vue 中的按钮,切换子组件中文字的颜色 -->
<button @click="themeColor='red'">红色</button>
<button @click="themeColor='blue'">蓝色</button>
<button @click="themeColor='orange'">橘黄色</button>
<hr />
<LevelOne />
</div>
</template>
<script>
import LevelOne from './components/LevelOne'
import { provide, ref } from '@vue/composition-api'
export default {
name: 'app',
setup() {
// 定义 ref 响应式数据
const themeColor = ref('red')
// 把 ref 数据通过 provide 提供的子组件使用
provide('globalColor', themeColor)
// setup 中 return 数据供当前组件的 Template 使用
return {
themeColor
}
},
components: {
LevelOne
}
}
</script>
template refs
通过 ref() 可以引用页面上的元素或组件。
元素的引用
1 | <template> |
组件11
2
3
4
5
6
7
8
9
10
11
12
13
14
15
16
17
18
19
20
21
22
23
24
25
26
27
28
29
30
31
32
33
34
35
36
37
38<template>
<div>
<h3>TemplateRefOne</h3>
<!-- 4. 点击按钮展示子组件的 count 值 -->
<button @click="showNumber">获取TemplateRefTwo中的count值</button>
<hr />
<!-- 3. 为组件添加 ref 引用 -->
<TemplateRefTwo ref="comRef" />
</div>
</template>
<script>
import { ref } from '@vue/composition-api'
import TemplateRefTwo from './TemplateRefTwo'
export default {
setup() {
// 1. 创建一个组件的 ref 引用
const comRef = ref(null)
// 5. 展示子组件中 count 的值
const showNumber = () => {
console.log(comRef.value.count)
}
// 2. 把创建的引用 return 出去
return {
comRef,
showNumber
}
},
components: {
TemplateRefTwo
}
}
</script>
组件21
2
3
4
5
6
7
8
9
10
11
12
13
14
15
16
17
18
19
20
21
22
23<template>
<div>
<h5>TemplateRefTwo --- {{count}}</h5>
<!-- 3. 点击按钮,让 count 值自增 +1 -->
<button @click="count+=1">+1</button>
</div>
</template>
<script>
import { ref } from '@vue/composition-api'
export default {
setup() {
// 1. 定义响应式的数据
const count = ref(0)
// 2. 把响应式数据 return 给 Template 使用
return {
count
}
}
}
</script>
createComponent
这个函数不是必须的,除非你想要完美结合 TypeScript 提供的类型推断来进行项目的开发。
这个函数仅仅提供了类型推断,方便在结合 TypeScript 书写代码时,能为 setup() 中的 props 提供完整的类型推断。1
2
3
4
5
6
7
8
9
10import { createComponent } from 'vue'
export default createComponent({
props: {
foo: String
},
setup(props) {
props.foo // <- type: string
}
})