vue全家桶也就是1.脚手架、2.路由、3.状态管理、4.请求工具~。
Vue是一套用于构建用户界面的MVVM渐进式框架。与其它大型框架不同的是,Vue的核心库只关注视图层,数据驱动,目标是通过尽可能简单的API实现响应的数据绑定和组合的视图组件,不再是传统的操作dom进行界面控制,当然也不是说完全不操作dom,必要的时候还是可以操作的,同时组件化的方式让项目维护起来特别的爽,Vue便于与第三方库或既有项目整合,当与单文件组件和Vue生态系统支持的库结合使用时,Vue也完全能够为复杂的单页应用程序提供驱动。
vue-cli
也叫vue脚手架工具,脚手架是为了保证各施工过程顺利进行而搭设的工作平台,顾名思义在vue中是用于快速构建vue项目的工具,构建的大致步骤如下:1
2
3
4
5
6
7
8
9
10
11# 安装vue脚手架
npm install -g vue-cli
# 安装webpack模板,testproject=项目名
vue init webpack testproject
# 安装项目需要的依赖包
npm install
# 运行项目
npm run dev
这样就可以跑出一个初始化的vue项目,拖到sublime就可以看到各目录文件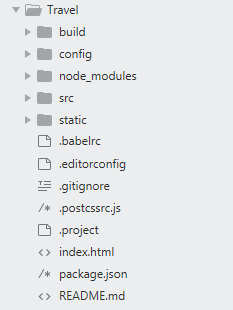
这个目录的意思就是1
2
3
4
5
6
7
8
9
10
11
12
13
14
15
16
17
18
19
20
21
22
23
24
25
261、build //项目构建(webpack)相关代码
# build.js=生产环境构建代码
# check-versions.js=检查node&npm等版本
# utils.js=构建配置公用工具
# vue-loader.conf.js=vue加载器
# webpack.base.conf.js=webpack基础环境配置
# webpack.dev.conf.js=webpack开发环境配置包括构建本地服务器
# webpack.prod.conf.js=webpack生产环境配置
2、config //项目开发环境配置相关代码
# dev.env.js=开发环境变量
# index.js=项目一些配置变量,上线时候的接口可以在这里配置
# prod.env.js=生产环境变量
3、node_modules //项目所有依赖包的安装文件夹
4、src //源码目录,也就是你写的代码在这里 5
# assets=资源目录(style、iconfonts、公用的varrybel.styl等)
# common=我自己建的用于存放公用组件的地方
# router=路由
# App.vue=项目入口文件
# main.js=程序入口文件
5、static //静态文件,放一些图片,json数据等
6、.babelrc //ES6语法编译配置
7、.editorconfig //定义代码格式
8、.gitignore //git上传的时候不希望上传的文件格式
9、 index.html //入口页
10、package.json //项目基本信息and这个项目所需要的依赖包,npm install的时候会根据这个去安装
11、README.md //项目的一些说明
vue-router
前端路由,就是指向的意思,类似a标签,当我点击某个地方或者链接时显示相应的内容,即Home => home 内容, detail => detail。
路由中有三个基本的概念 route, routes, router
1、route,一条路由,home => home是一条路由,detail => detail是另一条路由。
2、routes 一组路由,就是一条一条路由形成一个数组。[{home =>home}, { detail => detail}]
3、router 一个机制,用来管理路由。routes只是定义了一组静止的路由,当发生请求的时候,也就是当用户触发home的时候,router会到routes中去查找相对应的相对应的内容进行展示
构造一组路由:1
2
3
4const routes = [
{ path: '/home', component: Home },
{ path: '/detail', component: Detail}
]
用构造函数new vueRouter()构建一个router,然后传入routes进行管理:1
2
3const router = new VueRouter({
routes //key值和value值相等的时候可以只写key值
})
注入根实例之后就可以使用了1
2
3const app = new Vue({
router
}).$mount('#app')
举例动态路由
安装方法移步vue官网,这是我用的例子,大概结构就是有一个详情页的列表显示不同地方的旅游景点,我需要查看某个列表项的详情,这时候就用到了路由帮我带参数跳转过去,然后看到相应列表项的详情。
列表项组件1
2
3
4
5
6
7
8
9
10
11
12
13
14
15
16
17
18<div class="hot-title">推荐信息</div>
<ul>
<router-link
tag="li"
class="item border-bottom"
v-for="item of recommend"
:key="item.id"
:to="'/detail/'+item.id"
>
<img class="item-img" :src="item.imgUrl" alt="">
<div class="item-info">
<p class="item-title">{{item.title}}</p>
<p class="item-desc">{{item.desc}}</p>
<button class="item-button">查看详情</button>
</div>
</router-link>
</ul>
</div>
router目录下,index.js文件里头的写法,这是定义路径到组件的映射1
2
3
4
5
6
7
8
9
10
11
12
13
14
15
16
17
18
19
20
21
22
23
24
25import Vue from 'vue'
import Router from 'vue-router'
import Home from '@/pages/home/home'
import City from '@/pages/city/city'
import Detail from '@/pages/detail/detail'
Vue.use(Router)
export default new Router({
routes: [
{
path: '/',
name: 'Home',
component: Home
},
{
path:'/detail/:id',
name:"Detail",
component:Detail
}
],
scrollBehavior (to, from, savedPosition) {
return { x: 0, y: 0 }
}
})
可以参照我这个项目的玩法
router-view以及router-link
router-view:
也就是项目入口文件里的1
2
3
4
5
6
7<template>
<div id="app">
<keep-alive exclude="detail">
<router-view/>
</keep-alive>
</div>
</template>
是个很关键的组件,它就是用来渲染匹配到的路由的。 我这里搭配使用了keep-alive,keep-alive可以缓存数据,这样不至于重新渲染路由组件的时候,组件状态不被保存,也就是说从这个组件跳到其他组件再跳回来的的时候这个组件还是之前的状态
router-link
router-link是一个组件,它默认会被渲染成一个带有链接的a标签,通过to属性指定链接地址,被选中的router-link将自动添加一个class属性值.router-link-active。
router-link的一些配置项,用法可以看上面简单的例子
:to=””
使用路由必须设置的属性,否则路由无法生效,可以是一个字符串也可以是一个描述目标位置的对象。
tag=”li”
一般router-link默认被渲染成a标签,tag属性可以用来设置router-link会被渲染成什么标签
replace
是个Boolean值,默认是false。当replace设置为true,那么导航不会留下history记录,点击浏览器回退按钮不会再回到这个路由。1
<router-link to="xxx" replace></router-link>
打包刷新404
有时候你打包了一个dist放到服务器时访问好好的,突然用户刷新了一下页面,项目就404了,原因是前端项目的路由默认使用的mode是hash,也就是http://192.168.1.104:8080/#/app这样的类型,当然这也不利于做服务端渲染,hash一般是用来做定位的,而不是用来做路由的记录,而且hash路由不会被搜索引擎解析,所以也不利于seo优化,正常来说显示应该是http://192.168.1.104:8080/app,这个modo就是history,所以原因就是前端使用了historyurl之后是一个完整的资源路径,默认情况下服务端要进行匹配然后进行处理才能真正完成一个请求的操作,但是这在前端是没有问题的,如果手动刷新了浏览器,这个请求就会发送到服务端,服务端如果没有做任何处理,就会出现找不到资源或者404错误。
开发环境解决方案:1
2
3
4
5const devServer = {
historyApiFallback:{
index:'/index.html'
}
}
生产环境解决方案:
在服务端做匹配相关资源的配置,因为history模式下http://192.168.1.104:8080/app,会默认访问http://192.168.1.104:8080下面的资源
new一个Router的时候里面的一些参数
1 | mode:'hash' //默认hash,hash||history |
路由的参数
1 | import Login from 'login.vue' |
路由命名的好处在于可以在页面上通过
路由跳转的过渡效果可以通过transition实现
比如1
2
3
4
5
6
7<transition name="fade">
<router-view/>
</transition>
.fade-enter-active,.fade-leave-active
transition:opacity .5s
.fade-enter,.fade-leave-to
opacity:0
这样就有一个缓慢进入的效果
路由传参
比如要传一个id到index1
2
3
4
5{
path:'/index/:id'
component:Index
}
<router-link to="/index/111">首页</router-link>
然后可以在index组件的mounted的时候打印出传过来的id,console.log(this.$route.params),还有一种方法就是1
2
3
4
5
6
7
8
9
10
11
12
13
14
15
16
17
18
19{
path:'/index/:id'
props:true //将id作为props传入,这样就不需要用this.$route取值,而是直接props:['id']
component:Index
}
props可以自定义,比如id:222
{
path:'/index/:id'
props:{
id:'222'
}
component:Index
}
或者根据query来定义
{
path:'/index/:id'
props:(route)=>({id:route.query.xxx}) //route等于this.$route拿到的值
component:Index
}
命名视图
场景:同一个页面不同的部分显示同一个路由渲染,项目中场景就是有三个导航栏需要切换,顶部,侧边等…1
2
3
4
5
6
7
8
9
10
11
12
13
14
15
16 <transition name="fade">
<router-view/>
</transition>
...
<router-view name="namerouter"/>
然后在route中这么配置
export default [
{
path:'/' //路径
name:'login' //名字
components: {
default:Login //默认组件
namerouter:Login1 //name="namerouter"渲染组件
}
}
]
全局导航的路由钩子
1 | const router = createRouter() |
这几个钩子可以用来做路由跳转校验,例如当路由是login的时候跳转1
2
3
4
5router.beforEach((to,from,next)=>{
if(to.fullPath === '/login'){
next()
}
})
路有内部也可以增加钩子1
2
3
4
5
6
7
8
9
10
11
12
13export default [
{
path:'/' //路径
name:'login' //名字
components: {
default:Login //默认组件
namerouter:Login1 //name="namerouter"渲染组件
}
beforeEnter(to,from,next){ //进入这个路由之前被调用,执行顺序在router.beforEach之后,router.beforeResolve之前
next()
}
}
]
组件内部也存在路由的钩子1
2
3
4
5
6
7
8
9
10
11
12
13
14
15
16
17
18<script>
export default {
beforRouteEnter(to,from,next){
console.log('before enter')
next()
},
beforeRouteUpdate(to,from,next){ //同一个组件在不同路由跳转的时候触发
console.log('uodate enter')
next() //如果这个路由带了参数,可以在跳转的时候做判断 next(vm=>{console.log(vm.id)}),这样可以节省一个watch:{ id(val,oldval){}}
},
beforeRouteLeave(to,from,next){ //路由离开的时候触发,如果用户填了一个巨大的表单,离开的时候可以提示他
console.log('leave enter')
if(global.comfirm('are you sure?')){
next()
}
}
}
</script>
执行顺序就是,跳一个路由的时候
befor each invoked=>app route before enter=>before enter=>before resolve invoked=>after each
vuex
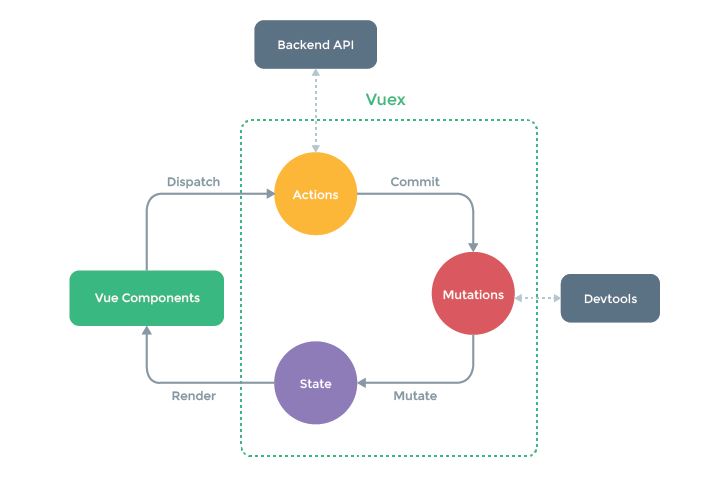
Vuex是Vue.js应用程序的状态管理模式+库。作为应用程序中所有组件的集中存储区,并且规则确保只能以可预测的方式对状态进行变更。也就是可以全局数据管理,其实就是一个单向数据的改变流程。
vuex核心概念:
1、state:驱动应用的数据源
2、getters:为组件提供经过处理的数据源
3、mutations:用来更改state的唯一标准方式
4、actions:组件通过调用actions来提交mutation
5、modules:每个module都有自己的state、getters、mutations、actions实现大型应用中业务模块数据的分支治
1、state:类似vue对象的data, 用来存放数据以及状态。存放的数据为响应式,如果数据改变,那么依赖数据的组件也会发生相应的改变。
获取state的两种方式例子:1
2
3
4
5
6
71.store.getters['xxx']
2. ...mapGetters({
UserInfo: 'xxx', // 用户信息
menuList: 'xxx', // approve 运价审批
RateUserInfo: 'xxxx' // Rate用户信息
})
可以通过mapState把全局的state和getters映射到当前组件的computed计算属性中。
2、actions
通过store.dispatch方法触发,action支持异步调用(可以调用api),mutation只支持操作同步,并且action提交的是mutation,而不是直接变更状态。Action函数接受一个与store 实例具有相同方法和属性的context对象,因此可以调用context.commit提交一个mutation,或者通过context.state和context.getters来获取state和getters。
3、mutation
每个mutation都有一个字符串的事件类型(type)和一个回调函数(handler)。这个回调函数就是我们实际进行状态更改的地方,并且它会接受state作为第一个参数。
4、Vuex允许在store中定义“getter”(可以认为是store的计算属性)。就像计算属性一样,getter的返回值会根据它的依赖被缓存起来,且只有当它的依赖值发生了改变才会被重新计算。
举例:为了方便在src目录下新建一个store目录,里头新建一个index.js,然后使用1
2
3
4
5
6
7
8
9
10import Vue from 'vue'
import Vuex from 'vuex'//引入Vuex
Vue.use(Vuex)//让vue使用vuex
export default new Vuex.Store({
state:{ //全局数据
key:'value'
}
})
写完这些之后在main.js里头写1
2
3
4
5
6import store from './store'
创建根vue实例的时候和使用vuetouter一样,当key=value的时候只需要写一个就好了
new Vue({
store
})
这样子它就会将数据 自动派发到每个子组件,比如子组件需要使用key的值,可以直接,就ko了。
假如要改变多个页面的额数据,在上面的基础之上根据官网提供的vuex生命周期触发点击事件的组件里面写这样的方法1
2
3
4
5methods:{
handelCheckHotcity(city){
this.$store.dispatch('changeCity',city)
}
}
store文件下的index.js的公共数据1
2
3
4
5
6
7
8
9
10
11
12
13
14
15
16
17
18
19
20import Vue from 'vue'
import Vuex from 'vuex'
Vue.use(Vuex)
export default new Vuex.Store({
state:{
city:'香港'
},
actions:{
changeCity(ctx,city){ //ctx是上下文,city是传入的参数
ctx.commit('changeCity',city)
}
},
mutations:{
changeCity(state,city){
	 state.city=city
}
}
})
组件也可以不用先dispatch触发changeCity方法,可以直接commit1
this.$store.commit('changeCity',city)
store文件下的index.js公共数据actions,直接写mutations对象,然后1
2
3changeCity(state,city){
state.city=city
}
vuex还有个好处就是可以在不同组件@click这个方法来对写了vuex逻辑的index.js文件里的数据进行修改1
2
3handelCheckHotcity(city){
this.$store.dispatch('changeCity',city)
}
分模块处理store
1 | export default { |
分模块的时候拿state和不分模块的时候拿的方式不一样,区别就像这样1
2
3
4
5
6
7
8
9
10
11
12
13
14
15computed(){
...mapState({
val:state=>state.value //不分模块的时候
val:state=>state.a.value //分模块的时候
}),
...mapGetters(['valPlus','a/valPlus']) //valPlus可以在template里面直接用,但是a/valPlus这个东西不能直接用,所以可以改成Obj的形式’
...mapGetters({ //真实环境中两个声明接受的值不会写一样,这里只是为了方便看清
valPlus:'valPlus',
valPlus:'a/valPlus'
})
}
methods:{
...mapMutations(['updateVal','a/updateVal']) //[0]不分模块的时候,//[1]分模块的时候
}
调用的时候也区分1
2
3
4
5mounted(){
this.updateVal('111') //不分模块的时候
this['a/updateVal']('111') //分模块的时候
}
namespaced是命名空间的概念,和我们写c++一样在include一大堆的后面加上当前的命名空间namespace code
调用actions的时候1
2
3
4
5
6
7
8mounted(){
this.actionsFunc() //全局的actions
this['a/actionsFunc']() //调用a模块下面的actionsFunc
},
methods:{
...mapActions(['actionsFunc']) //全局的actions
...mapActions(['a/actionsFunc']) //调用a模块下面的actionsFunc
}
动态注册模块,1
2
3
4
5store.registerModule('c',{
state:{
value:2
}
})
调用方式一样1
2
3
4
5computed:{
...mapState({
cvalue:state=>state.c.value
})
}
解绑一个模块,1
store.unregisterModule('c')
store里面的watch,这个方法和getters一样,只不过这个方法接收两个函数参数1
2
3
4
5store.watch((state)=>{ //watch接收两个函数,第一个里面可以watch state,当state改变之后触发第二个函数回调
state.value + 1
},(newValue)=>{
console.log(newValue)
})
store里面的subscribe,监听所有mutations1
2
3
4store.subscribe((mutation,state)=>{
cosnole.log(mutation.type) //触发的mutations
console.log(mutation.payload) //接收的参数
})
store里面的subscribeAction,监听所有actions1
2
3
4store.subscribeAction((action,state)=>{
cosnole.log(action.type) //触发的actions
console.log(action.payload) //接收的参数
})
store里面的plugins1
2
3
4
5
6
7
8
9
10
11
12
13
14export default ()=>{
const store = new Vuex.Store({
strict:isDev,
state,
mutations,
getters,
actions,
plugins:[
(store)=>{
console.log('invoked') //会在store初始化的时候执行
}
]
})
}
开启热更新的功能,就是说vuex的状态改变的时候需要刷新一下页面才看的到效果,所以vuex里面也提供了热更新的api1
2
3
4
5
6
7
8
9
10
11
12
13
14
15
16
17
18
19
20
21
22
23
24
25
26
27
28
29
30export default ()=>{
const store = new Vuex.Store({
strict:isDev, //开发环境开启严格模式,防止团队一些同学写出不规范的代码
state,
mutations,
getters,
actions
})
if(module.hot){
module.hot.accept([
'./state.js',
'./mutations.js',
'./actions.js',
'./getters.js'
],()=>{
const newState = require('./state.js').default
const newMutations = require('./mutations.js').default
const newGetters = require('./getters.js').default
const newActions = require('./actions.js').default
store.hotUpdate({
state:newState,
mutations:newMutations,
getters:newGetters,
actions:newActions
})
})
}
return store
}
分模块随便写了一个简单易懂的demo
src/store/index.js1
2
3
4
5
6
7
8
9
10
11
12
13import Vue from 'vue'
import Vuex from 'vuex'
import todolist from './modules/todolist'
Vue.use(Vuex)
const store =new Vuex.Store({
modules: {
todolist
}
})
export default store
src/store/modules/todolist.js1
2
3
4
5
6
7
8
9
10
11
12
13
14
15
16
17
18
19
20
21
22
23const state = {
list: ['hardy1', 'hardy2']
}
const mutations = {
addValToList(state, data) {
state.list.unshift(data)
},
remoValToList(state, index) {
state.list.splice(index,1)
}
}
const actions = {
addTolist({ commit }, data) {
commit('addValToList', data)
},
remTodolist({ commit }, index) {
commit('remoValToList',index)
}
}
const getters = {
}
export default { state, mutations, actions, getters }
全局使用/App.vue1
2
3
4
5
6
7<script>
import store from './store/index'
export default {
name:'App',
store
}
</script>
components/todolist.vue1
2
3
4
5
6
7
8
9
10
11
12
13
14
15
16
17
18
19
20
21
22
23
24
25
26
27
28
29
30
31
32
33
34
35
36
37
38
39
40
41
42
43
44
45
46
47<template>
<div class="todolist">
<div>
<input type="text" v-model="inputVal" />
<input type="button" @click="handelAdd" value="ADD" />
</div>
<div>
<ul>
<li
v-for="(item,index) in list"
:key="item"
>
{{item}}
<span style="cursor:pointer" @click="handelRemove(index)">X</span>
</li>
</ul>
</div>
</div>
</template>
<script>
import { mapActions, mapState } from "vuex";
export default {
data() {
return {
inputVal: ""
};
},
computed: {
...mapState({
list: state => {
return state.todolist.list;
}
})
},
methods: {
...mapActions(["addTolist","remTodolist"]),
handelAdd() {
this.addTolist(this.$data.inputVal);
this.$data.inputVal = "";
},
handelRemove(index) {
this.remTodolist(index)
}
}
};
</script>
axios
axios是一个基于Promise用于浏览器和nodejs的HTTP客户端,可以实现跨平台数据请求,node平台上可以发送http请求,1
npm install axios --save
了解过ajax的道友应该都懂了,这里我在mounted里面触发了一个methods里面的getDetailData方法,向接口请求数据来实现交互效果1
2
3
4
5
6
7
8
9
10
11
12
13getDetailData(){
axios.get('接口地址',{
params:{
id:this.$route.params.id
}
})
.then((res)=>{
console.log(res)
})
.catch((err)=>{
console.log(err)
})
}
post请求
1 | axios.post('/user', { |
请求多个并发
1 | function getUserAccount() { |
最近一直在熬夜,准确的说今年一直在熬夜ლ(′◉❥◉`ლ),渐渐觉得深夜才能创造灵感,不过白天眼睛痛~感觉都要开启永恒万花筒写轮眼了~
更多用法可以参照这里